How to Use Auto Duck in Audacity: Are you ready for seamless audio editing with Audacity’s auto duck feature? Auto Duck is a game-changing tool revolutionizing mixing and managing audio tracks. Whether you’re a budding podcaster, a professional music producer, or someone passionate about perfecting your audio projects, mastering Auto Duck in Audacity can elevate your work.
You can effortlessly blend your music and voiceover tracks, creating that perfect podcast episode or music mix with the finesse of a seasoned audio engineer. With our step-by-step guide, you’ll unlock the full potential of Auto Duck, allowing you to achieve professional-sounding audio edits with ease.
Keep reading to unravel the secrets of using Auto Duck in Audacity and transform your audio editing skills from novice to expert starting today!
On this page, you’ll learn about the following:
How to Use Auto Duck in Audacity
First, ensure you have your computer’s most recent version of Audacity. The 2024 edition has a lot of improvements that make the Auto Duck tool easier to understand and use. If you dont have it yet, you can download it from Audacity’s official website- www.audacityteam.org/. Once you have it downloaded, you can now proceed to the process.
- Adding your tracks
Drag the tracks you want to change to begin using Auto Duck. This could be your voice track and background music. To add your tracks to Audacity, go to “File” and “Import.”

- Applying the Auto Duck Effect
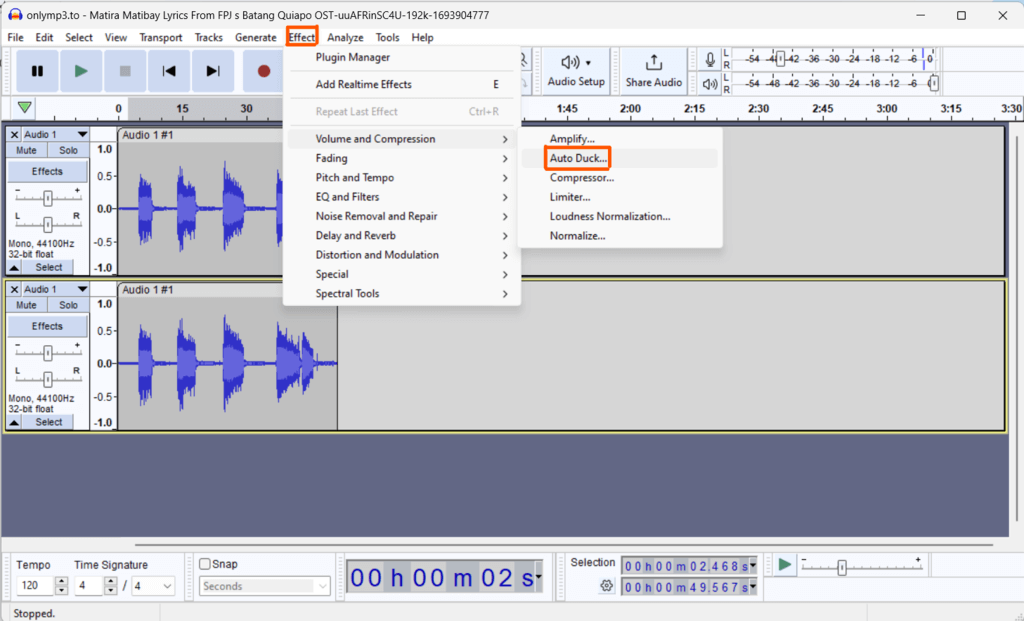
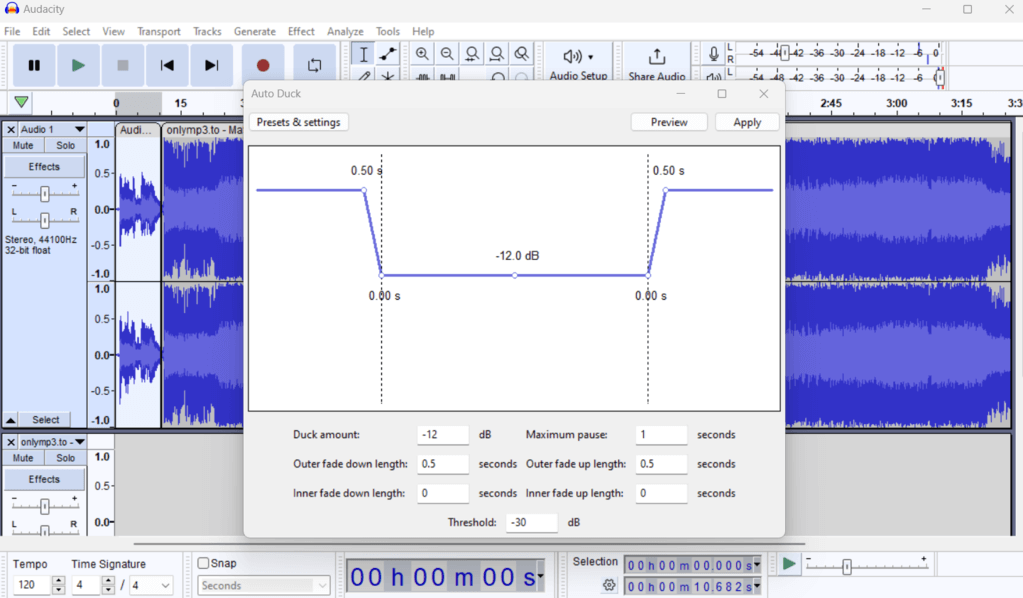
Once you have your tracks, select the music track where you want the ducking to happen. Afterward, go to “Effect” and pick “Auto Duck.” This brings up a box with choices that you can change to suit your needs.
- Fill out the preset and settings menu according to your preferences.
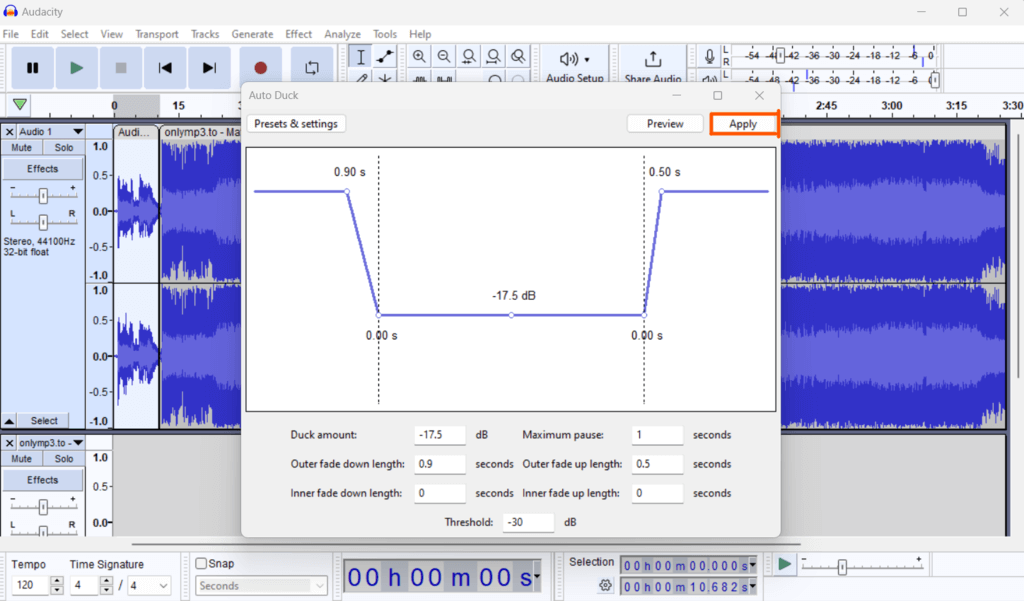
- Click Apply
You can now click the Apply button if you set up all your preferred settings.
Tips and Techniques for Using Auto Duck in Audacity
To get the most out of Audacity’s Auto Duck tool, here are some tips and tricks:
- Know the point of Auto Duck: Auto Duck’s main job is to turn down the sound of a background track (like music) when a foreground track (like a voiceover) starts playing. It’s necessary to make podcasts, radio shows, and movies that look good.
- Use the Most Recent Version of Audacity: To get the best experience and the newest features, ensure you are using the most recent version of Audacity.
- Import the right tracks: Add your background music and foreground audio (like voiceover or conversation) to Audacity. For ducking to work, make sure they are on different tracks.
- Set up the auto-duck settings properly: There will be several choices, such as “Duck amount,” “Inner fade-in/out time,” and “Outer fade-in/out time.” Change these settings to fit the needs of your project.
- Duck Amount: This setting lets you change how much the volume of the background track is lowered. If the number is higher, the reduction is bigger.
- Fade Times: Change the “Inner fade-in/out time” to change how fast the background noise goes up or down. ‘Outer fade-in/out time’ controls how long the fade lasts.
- Preview Feature: Press the “Preview” button in the Auto Duck window to hear how your changes sound before you apply the effect.
- Save Presets: If you find a setting that works well for a certain kind of job, bookmark it so you can use it again later.
- Keep It Natural: Aim for a normal volume drop. Listeners can be shocked by sudden or big changes.
- Regular Updates: Ensure you install and update your Audacity software to get the latest Auto Duck feature fixes and changes.
With these tips and tricks, you can use Audacity’s Auto Duck feature to make audio for various multimedia projects that sound like a professional made it.
Troubleshooting Common Auto Duck Issues
Of course! Here are some common problems you might have with Audacity’s Auto Duck tool, along with ways to fix them:
| Issue | Causes | Solution |
|---|---|---|
| Inconsistent Volume Reduction | The background track might not be ducking all the time or the way you’d expect it to. | Check the Auto Duck window to see how your thresholds are set. |
| Abrupt Volume Changes | The background track’s volume might change too quickly, making the sound jarring. | Change the Auto Duck settings for “Inner fade-in/out time. |
| Over-Ducking or Under-Ducking | The audio track may become too quiet or not quiet enough while ducking. | Change the setting for the Duck amount |
| Timing Problems | The ducking might not line up properly with the beginning or end of the sound in the foreground. | Change the options for Outer fade-in/out time. |
| Background Noise in the Foreground Track | Ducking that isn’t needed. | Clean up the main track with Audacity’s noise reduction tools before you use Auto Duck. |
| Auto Duck Not Available | Outdated Audacity App | Make sure you have the most recent version of Audacity installed. |
There you have it! Remember that editing music in Audacity well usually takes some trial and error. Don’t be afraid to try different Audacity settings until you get the sound you want for your project.
FAQs
The Auto Duck tool in Audacity turns down the volume of a background track (like music) when a foreground track (like a voiceover) starts playing.
You can change the volume decrease by changing the “Duck amount” setting in the Auto Duck window.
Auto Duck is mostly made for post-production editing, so it can’t be used for live recordings.
Make sure that your tracks are named correctly and aren’t muted or soloed in the wrong way. Also, ensure the settings in the Auto Duck window are right.
Auto Duck works great for podcasts, radio shows, and films that need to balance music and voiceover. It might not work well in all situations where you need to edit sounds.
Want to see the process in action? Check out the video below.
Conclusion
You have now finished reading the complete guide on how to use Auto Duck in Audacity 2024. Now that you know these things and have these tips, you can confidently take on any audio job. You have the tools to make a professional sound experience, whether for a podcast, a music mix, or adding commentary on top of music.
Picture your audience mesmerized by how your voice and background sounds blend. Once you know Auto Duck well, your audio projects will sound more professional and great.
Don’t stop learning now! Use what you’ve learned in your next music project. Try out different choices, figure out any problems, and ensure your software is always up to date. The steps you need to take to become an audio editing pro with Audacity’s Auto Duck tool are coming together. Accept it, and your music projects will become captivating works of art.
For more Audacity tips, tricks, and in-depth guides, visit AudacityGuide. We have a lot of information to help you learn new things or improve at using Audacity.